You can choose the perfect repertoire, write a beautiful long-range plan, and prepare the most thoughtful lesson in the world—and still spend the first twelve minutes of rehearsal looking for pencils, replacing reeds, locating missing music, and reminding someone that their instrument case cannot live in the middle of the aisle.
Before we decide what we want students to play, we need to ask a more foundational question:
What do I want my rehearsal to look like, feel like, and sound like?
Then comes the slightly less glamorous question:
What systems need to be in place to make that possible?
Because the rehearsal we imagine does not appear magically when students walk through the door. It is built through the routines, language, visual supports, physical organization, and expectations we establish from the beginning.
Routines Aren’t About Control. They’re About Clarity.
When students know what to expect, they can spend less energy figuring out what is happening and more energy participating in the music.
Executive-function skills help us plan, focus attention, remember information, switch between tasks, and regulate our responses. These are all things students are expected to do—often simultaneously—in a band rehearsal. The Center on the Developing Child at Harvard University describes executive function and self-regulation as the brain’s air-traffic-control system: the skills that help us manage information, make decisions, and plan ahead.
Band asks a lot of that system.
Students must read notation, remember fingerings, listen across the ensemble, watch the conductor, control their bodies, adjust their sound, manage equipment, and respond to feedback—sometimes within a single measure.
For students with ADHD, autism, anxiety, dyslexia, processing differences, or still-developing executive-function skills, predictable routines are not simply a nice classroom-management bonus. They can be the access point.
Researcher Adele Diamond’s review of executive-function research identifies working memory, inhibitory control, and cognitive flexibility as core executive functions. Stress can interfere with those skills. When we reduce unnecessary uncertainty, we leave students with more capacity for the actual work of learning.
Structure first. Independence second.
Start With the Rehearsal You Want
What should it look like?
Maybe students enter, collect what they need, and begin setting up without waiting for individual instructions.
Chairs and stands are placed correctly. Instruments, binders, pencils, and water bottles are ready. Cases are safely out of the way. The rehearsal plan is visible at the front of the room, and students know where to look when they are unsure what happens next.
The room does not have to be perfectly silent or Instagram-ready. It should look purposeful.
What should it feel like?
I want my band room to feel predictable without feeling rigid.
Students should know that mistakes are expected, questions are welcome, and there is usually a strategy they can try before deciding they cannot do something.
The room should feel safe enough for students to make an unfortunate noise on a brand-new instrument, laugh, adjust, and try again.
It should also feel like a shared space. Students are not visitors waiting for the teacher to manage every object and solve every problem. They are members of an ensemble who gradually learn to care for the room, the equipment, one another, and the rehearsal process.
What should it sound like?
A productive band room is not necessarily a quiet band room.
It may include instruments warming up, students helping one another find a fingering, a setup timer playing, a student leading a warm-up, or a section quietly “ghosting” fingerings while another group rehearses.
The goal is not silence. The goal is purposeful sound.
Early in the year, I brainstorm with my students about the difference between music and noise. Our working definition is simple:
- Music is planned. It has a purpose and some kind of form.
- Noise is random. It is something that happens rather than an intended end product.
Once we have built that shared language, I do not need a long lecture when the room becomes too loud or silly. I can simply ask, “Is this music or noise?” Students know what I mean, and they have a clear standard they can use to reset themselves.
We also have to teach what we want a warm-up to sound like. Do students play as soon as their instrument is assembled? Are they testing one note, practising a familiar pattern, or playing anything they choose? What volume is appropriate? When does the room need to return to silence? “Warm up” is not a complete direction until students have heard, seen, and practised what a purposeful warm-up sounds like in your room.
There is a significant difference between productive musical noise and chaos with a trumpet in it.
Build an Entry Routine Students Can Learn
My students begin working before I have finished taking attendance.
As they enter, they move their named popsicle stick into our “Jar of Destiny.” This gives me an immediate visual record of who has arrived. My attendance helper later brings me the sticks that remain, and I verbally confirm those absences before entering them.
While that is happening, students set up their rehearsal spaces:
- Chair
- Music stand
- Instrument
- Band binder
- Pencil
- Water bottle
- Instrument case moved safely out of the rehearsal area
Some students can remember that sequence after hearing it once. Some cannot—and repeating the instructions more loudly does not magically create working memory.
For students who need additional support, I use laminated setup cards that allow them to work through the routine one step at a time.
A setup routine should answer three questions:
- What do I do when I enter?
- What materials do I need?
- What should I begin while I am waiting?
When those answers are predictable, the start of rehearsal becomes calmer for everyone—including the teacher.
I also use a musical setup countdown as a consistent cue. It is fun, visible, and much more pleasant than repeating, “You should be ready by now,” seventeen times.
Make the Plan Visible
Verbal directions disappear the moment they are spoken.
A visual rehearsal plan—whether it is a projected slide, written agenda, or posted routine—acts as an external executive-function support.
- Reduce repeated questions
- Lower anxiety
- Help students recover when they miss a direction
- Show students what is coming next
- Support students in working more independently
This aligns with the CAST Universal Design for Learning Guidelines, which emphasize clarifying goals, supporting different ways of perceiving information, and building learner agency.
My lesson slides may include the setup expectations, a Big Brain Check-In, the warm-up, repertoire for the day, reminders, important dates, play-along materials, and a timer when one will be helpful.
The visual plan also helps my neurodivergent teacher brain. I am far less likely to forget an announcement—or suddenly realize that I skipped the warm-up—when the plan is visible to all of us.
Teach Students Where to Look Before They Ask
Students often default to asking the teacher because we have accidentally trained them to believe that the teacher is the keeper of all answers.
I want my students to have more than one possible starting point.
- Is the answer posted somewhere in the room?
- Is it in your binder, fingering chart, or resource section?
- Can your section leader help you look it up?
- What strategy have you already tried?
- If you still cannot solve it, ask the teacher.
The important word is with.
A section leader should help another student look up a fingering with them—not simply provide the answer and become a smaller, unpaid version of the teacher.
Give Students Something Productive to Do While They Wait
There will always be moments when one section is receiving focused instruction and everyone else needs to wait.
“Sit quietly” is not a particularly musical or realistic plan.
Instead, teach students a small menu of acceptable rehearsal behaviours. They might follow along in their own music, move their fingers silently while whispering note names, practise changing between two difficult fingerings, mark their music, check a fingering or musical term, or listen for something specific in another section.
We call silent fingering practice ghosting. I sometimes laminate small reminder cards and place them on music stands for students who need that menu kept visible.
Create a Predictable Practice-Room Procedure
Practice rooms can be useful, but “go practise” is not a procedure.
- Tell the class what you plan to work on.
- Play the passage before leaving.
- Estimate how much time you need.
- Take a timer into the practice room.
- Return when the timer ends.
- Play the passage again and receive feedback.
I keep a second timer with me because, between the student and the teacher, there is at least a reasonable chance one of us will remember that they are still in there.
Use Student Leadership Strategically
Student leadership does not have to be reserved for the strongest players.
I rotate section leaders so different students have opportunities to help with small, practical responsibilities: locating fingerings, showing a classmate where the ensemble is starting, directing someone to the reed supply, modelling how to find an answer, and checking that a section has the necessary materials.
Students can also lead familiar warm-ups. This gives them an opportunity to conduct and gives me a few minutes to complete attendance, help with an instrument issue, or distribute supplies.
Two excellent sources of ready-to-use materials are John McAllister Music’s warm-ups and StepWise Publications’ free warm-ups and timers. Play-along resources can keep the ensemble meaningfully engaged while the teacher handles the tiny emergencies that seem to reproduce whenever beginner instruments enter a room.
Give Everything a Visible Home
The physical room can either support your routines or quietly sabotage them.
If students do not know where something belongs, it will eventually be placed somewhere creative.
My percussion equipment is stored visibly on labelled wall grids. Students can see where each instrument and mallet belongs, and I can check the area quickly before dismissing them. I also take a photograph of the correctly organized setup and post it beside the storage area. Students do not have to remember what “clean up properly” means—they can compare the wall to the picture.
And yes, I name pairs of mallets. Students may not care where “the other yarn mallet” went, but they care very much that SpongeBob has been separated from Patrick. It sounds ridiculous because it is ridiculous. It also works.
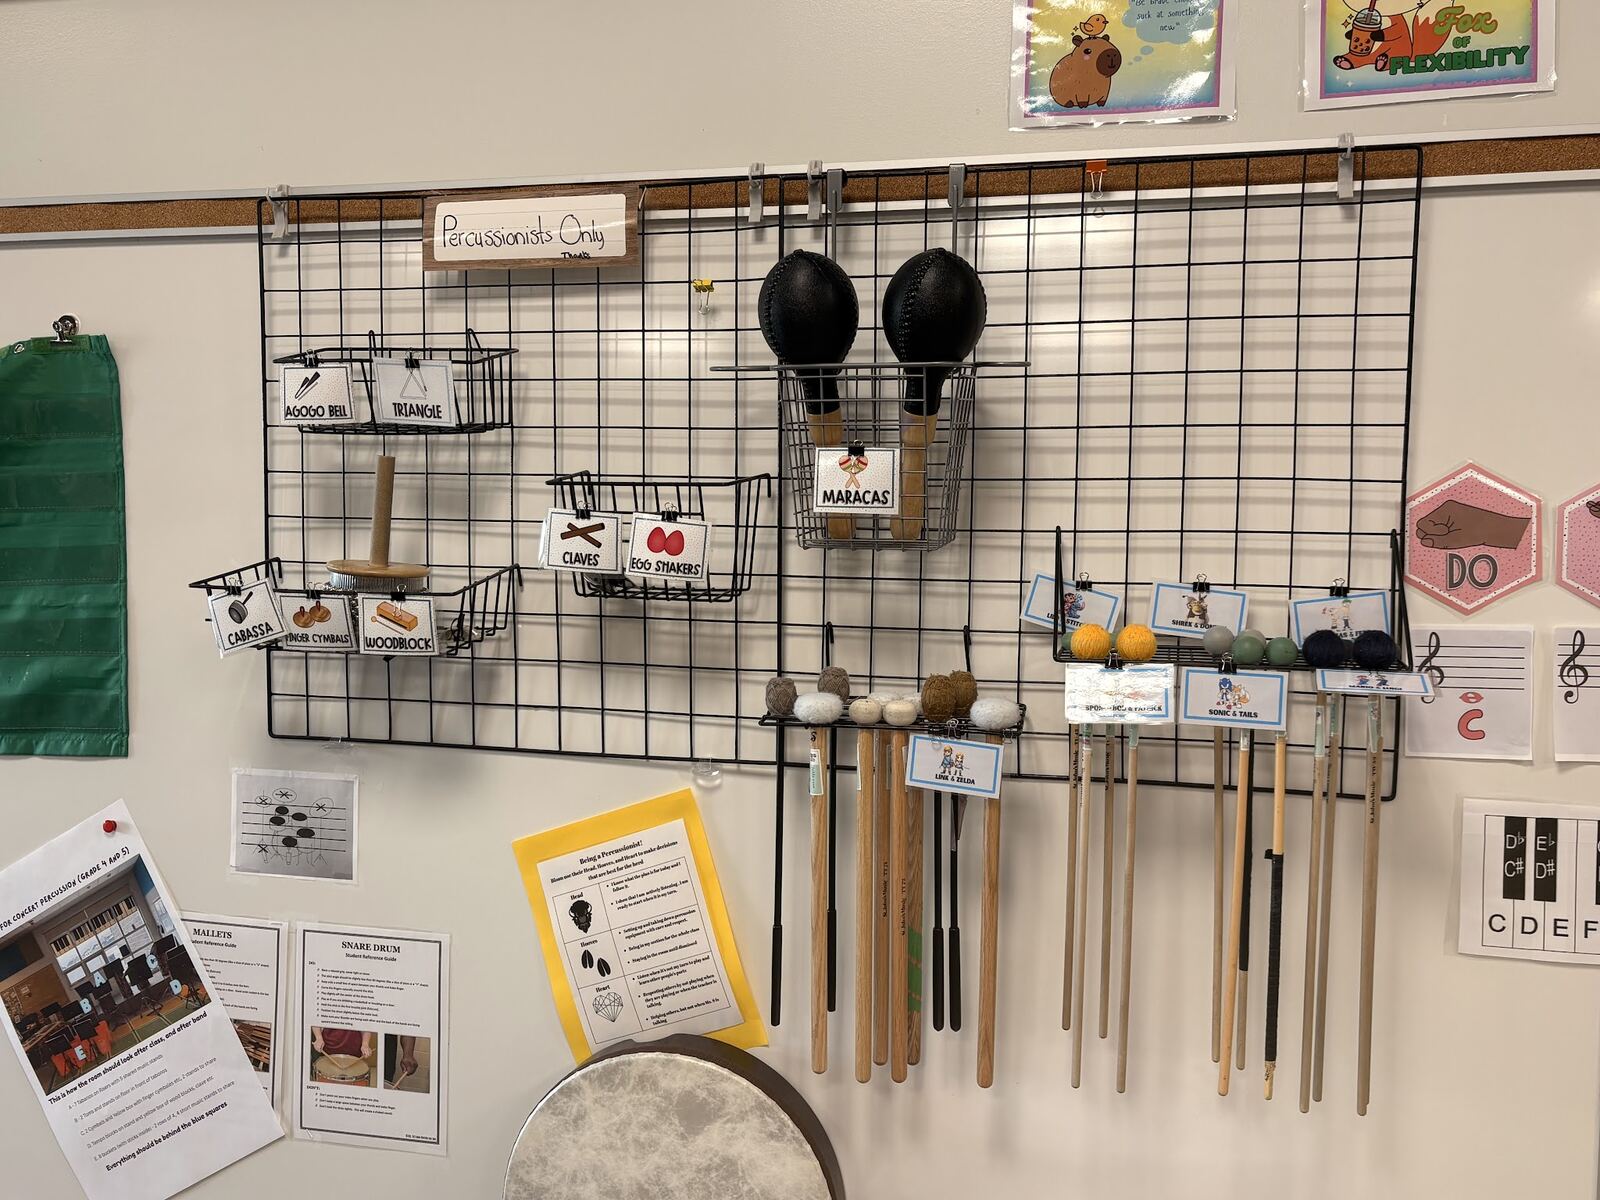
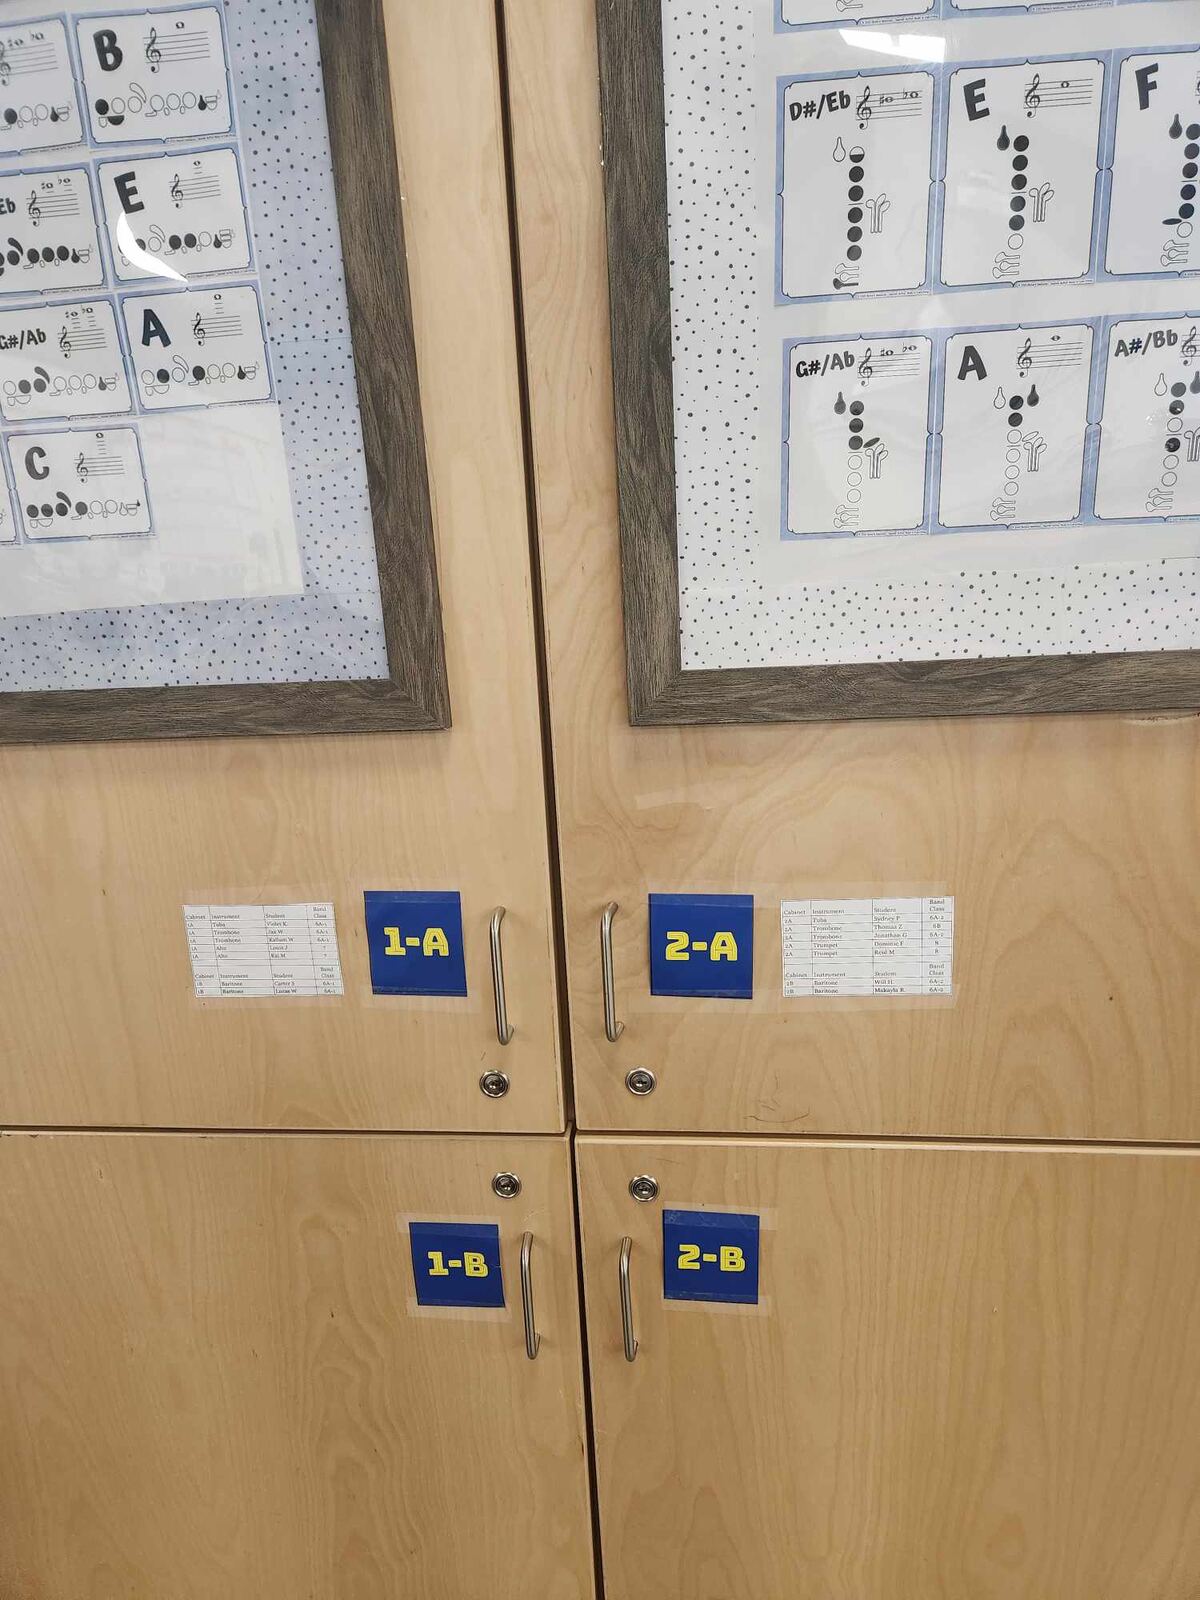
Each student’s assigned instrument-storage space is posted near the storage area, recorded in their binder, and added to the luggage tag on the instrument. This makes instruments easier to return, locate, and retrieve when a student is absent.
Replace the Music Folder With a System
I hate music folders.
We hand a child a folder, fill it with loose paper, and then act surprised when the music vanishes into another dimension.
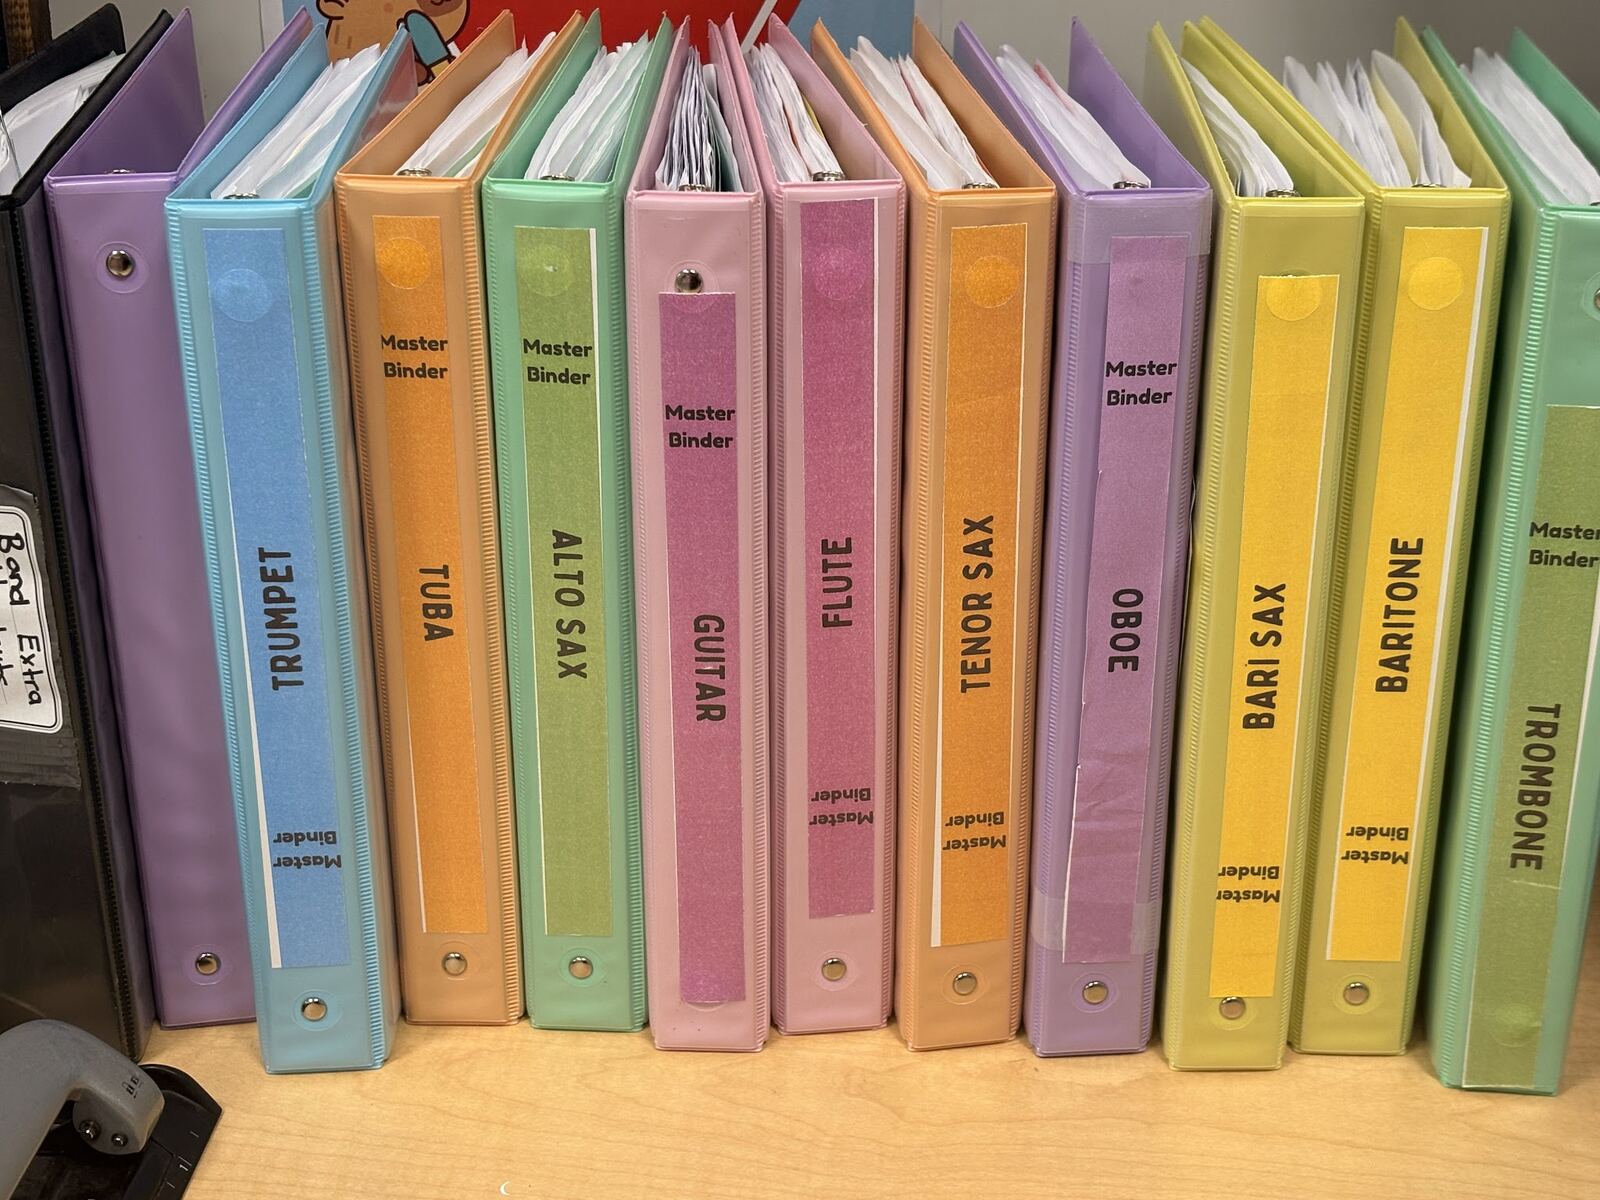
My students use band binders with dividers for Big Brain Check-Ins and theory, warm-ups, method or lesson materials, sheet music, and resources such as fingering charts and instrument-care information.
The first page identifies the student, their instrument, serial number, rental information, class, and assigned storage space. The binder is not just paper storage. It is another place students can look for answers before relying on the teacher.
I also keep master binders organized by instrument. Students can use them in class, but pages stay in the binder. If a replacement copy is needed, the entire binder can go to the office to be photocopied.
Teach Consistent Language
Students need language for understanding what kind of musical work they are doing.
- Practice: I am learning my part.
- Rehearsal: We are learning one another’s parts and improving together.
- Performance: We are ready to share our music with an audience.
This helps students recognize that a rehearsal is not simply a collection of individual practice sessions happening in the same room. Every musician has responsibilities to the ensemble: keeping time, listening, entering independently, making adjustments, and recovering when something goes wrong.
You Do Not Need Every System on Day One
Please do not read this list, design fourteen new procedures tonight, and then attempt to teach all of them during the first rehearsal.
Choose the systems that will solve your biggest predictable problems. Start with how students enter, how they set up, where the rehearsal plan is displayed, what students do when they need help, what they can do while another section is working, how materials and instruments are stored, and how the room is reset before dismissal.
Teach those systems explicitly. Practise them. Use the same language. Make the steps visible.
Then notice where the friction remains.
If students continually interrupt to ask where you are starting, add a visual cue for the measure number. If percussion equipment migrates across the room, add labels and a reference photo. If students cannot work independently while you help another section, teach and post a short list of productive options.
Your routines do not need to be perfect before the first day. They need to be clear enough to begin—and flexible enough to improve. We will add to them as the year unfolds.
Before the First Downbeat
The goal is not to create a room where students quietly obey a complicated collection of procedures.
The goal is to create a room where students know how to begin, where to look, what to try, how to ask for help, and how to recover when things do not go according to plan.
That is where resilience begins.
Not with a motivational poster. Not with telling students to “try harder.” It begins when students have a strategy—and enough clarity and support to use it.
Before you plan the first piece, ask yourself:
- What do I want my rehearsal to look like?
- What do I want it to feel like?
- What do I want it to sound like?
- What systems will help us build that room together?
The first downbeat matters. But everything that happens before it makes that downbeat possible.
Watch the Systems in Action
For More on Each Topic
Sometimes it is easier to understand a classroom system when you can actually see it in action.
Starting Rehearsal
A consistent visual and musical cue for setting up chairs, stands, instruments, binders, pencils, and other materials.
The Band Binder
See how binders organize warm-ups, learning materials, sheet music, fingering charts, and instrument-care resources.
Instrument Storage
A closer look at assigned spaces, labels, binder records, and instrument tags that support student independence.
A strong rehearsal culture is not built in one perfect first week. It is built one clear, repeatable routine at a time.
From The First Downbeat
Want to go deeper?
This article was developed alongside Session 2 of The First Downbeat, Sarah’s beginner band mentorship course. The course combines live learning, practical resources, and ongoing support for teachers building programs of their own.
Explore The First Downbeat